Johan Cruyff once famously said, “Playing football is very simple, but playing simple football is the hardest thing there is.” This philosophy underscores the essence of rondos—a cornerstone training tool for any soccer coach seeking to elevate their team’s performance.
Rooted in principles such as numerical superiority, decision-making, and coordination between teammates, rondos provide a dynamic way to train both attack and defense. Whether you’re coaching Bayern Munich or a youth team, understanding how to design and implement rondos can revolutionize your approach to training.
From a traditional rondo to an advanced rondo variation, these drills prepare players to outwit opponents, maintain possession, and react with precision under pressure.
By mastering the art of the rondo, soccer coaches can instill critical skills like spatial awareness, quick passing, and tactical decision making in their players. Incorporating principles such as positional play superiorities ensures players learn to exploit space and time, creating advantages on the pitch.
A well-designed rondo not only enhances individual skills but also fosters collective synergy, where the interplay between teammates becomes second nature. This article provides a step-by-step guide to designing effective rondos, helping football coaches to integrate these drills into their training sessions while honoring the legacy of Cruyff’s vision.
What is a Rondo?
Football players frequently train to maintain possession using Rondos, a fantastic method for developing technical ability, cognitive skills, spatial awareness, individual tactics, and teamwork.
At its basis, the rondo is designed to simulate in-game situations where players must think quickly, work together, and adapt under pressure. By repeatedly practicing rondos, teams can improve their coordination and decision-making, laying the foundation for success on the field.
The basic idea of a rondo drill is that a larger group of players maintains possession of the ball against a smaller number of defenders. This creates a numerical advantage for the attackers, allowing them to practice quick passing and positional play.
Typically, players with the ball position themselves around the edges of the playing area, though some attackers may also occupy the inside spaces to add complexity. The primary objective is to complete as many passes as possible without losing possession, all while defenders work tirelessly to regain control.
In this tutorial, we’ll explore how to design effective and practical rondo drills. These exercises not only improve a team’s ability to use passing lanes and maintain possession but also build cooperation between teammates and tactical awareness.
Whether you’re looking to develop individual skills or help overall team cohesion, mastering rondos is a crucial step for soccer players and coaches alike.
Disclosure: Please note that some of the links below area affiliate links and at no additional cost to you I will earn a commission. Know that i only recommend products services and brands i have personally used and stand behind. When you use one of my affiliate links, the company compensates me, which helps me run this blog and keep my in -depth content free of change for readers (like you). Read our disclosure for more info.
Table of Contents
Step 1: Set the Objective
Setting the goal is the first step in designing a Rondo game. What do you want your players to accomplish? Where would you like for the players to focus:
- Attacking
- Decision-making, ball control
- Passing accuracy
- Offering support
- Identify the different passing lines
- etc.
- Defending
- Pressure and cover
- Close the center
- Pressing triggers
- etc.
Once the goal has been established, you can create a drill specifically for your squad.
Step 2: Determine the Number of Players
The number of players who will take part in the game will be decided in the following phase. Usually, 5-8 players are in possession, while 2-3 defenders are defending. Typical relationships can be 3 v 1, 4 v 2, 5 v 2, 6 v 3, etc. The attacking players are usually more than the defenders. 1 or 2 neutral players can also be used in case this will make the drill more effective.
In regards to the players involved, there is much flexibility. You can change the numbers in accordance with the drill or session objective, the day of the weekly microcycle, the player’s level of technique, etc. For instance, you can reduce the number of players in possession and increase the number of defenders if you want to make the drill more difficult.
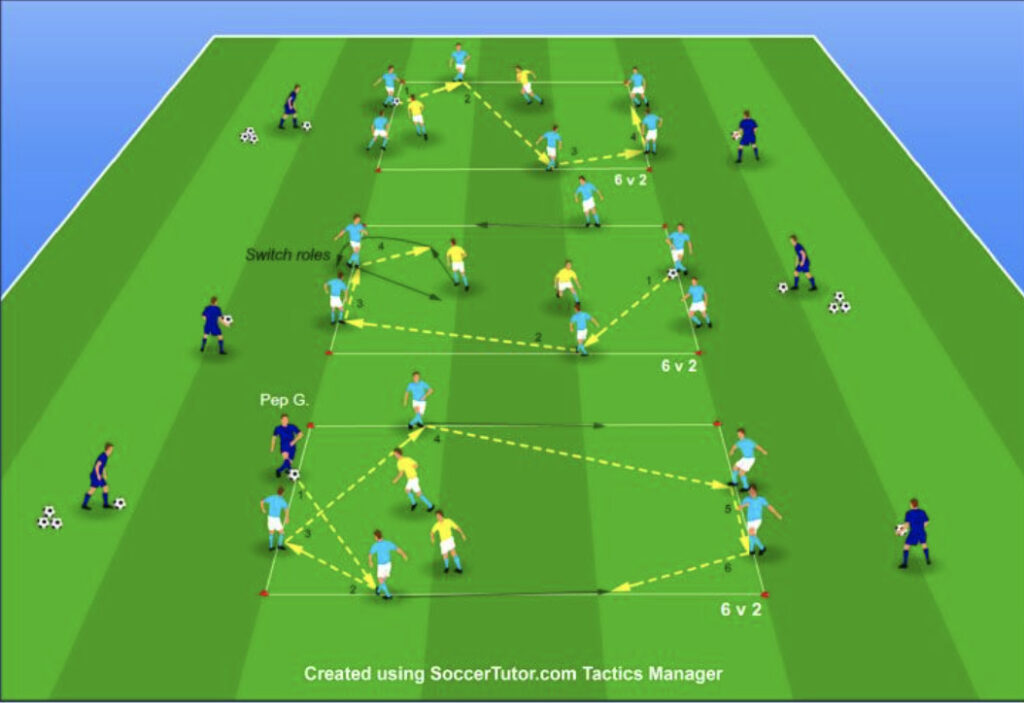
You want more material on Rondos and Possession drills? Check the book “PEP GUARDIOLA – 85 PASSING, RONDOS, POSSESSION GAMES & TECHNICAL CIRCUITS DIRECT FROM PEP’S TRAINING SESSIONS“. Below is an example.
TACTICS MANAGER PRO – CREATE DRILLS, TACTICS AND SESSION PLANS (APP)
Coaching software that enables you to create your own practices, tactics and plan sessions
- One-time only cost + Free Version updates for life!
- Quick and easy to use – Create diagrams in minutes!
- Work offline – No Internet Connection needed!
- Use on Win, Mac, iPad, Android Tablet & Chromebook
Step 3: Define the Playing Area
An important element of rondos is the playing field. You should plan a playing environment that is appropriate for the number of players and serves the objective.
For instance, a larger playing area can be used if there are several players so that they have more room to maneuver around. This will help player which are not so developed on a technical level. Also, large spaces can be used for Microcycle Day and the main focus in regard to the Physical-Conditioning aspect is Endurance .
Use a smaller playing area to practice passing quickly and in confined situations or to allow much of duels, the chance of directions, and explosive movements without the ball to offer support. This would be great on a day when Strength is the main Physical element to be trained.
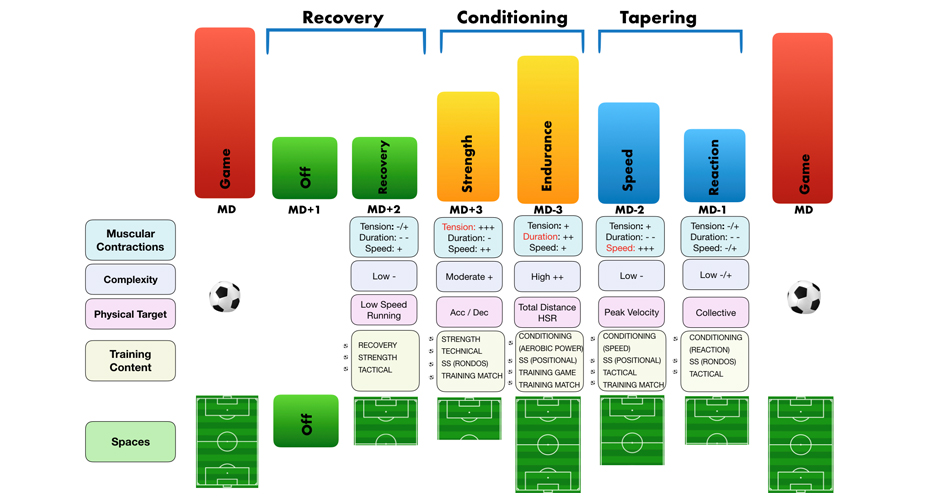
Weekly Microcycle example – Condition Elements and spaces to use
Step 4: Choose the Type
Before reading the below, read the article “The 4 best Rondos – How to play the Guardiola way” to get some ideas for Rondos.
There are several types of Rondo drills that you can choose from based on the objective and the skill level of your players. Here are some of the most popular types:
- Standard Rondo : This is the most basic type of Rondo drill where a group of players keeps possession against a smaller group of defenders.
- Double or more Rondo: This is a more advanced type of drill where the players form two or more rondos, playing at the same time. The use of each area depends on the drill’s rules. The coach sets for example a number of passes that allows the players to move to a new area.
- Based on touches:
- Two-Touch Rondo : This type of drill limits the number of touches each player can take before passing the ball, encouraging quick decision-making and ball movement.
- One-Touch Rondo : This is an advanced version of the Two-Touch drill where players are only allowed to take one touch before passing the ball.
- Free-touch: This is the less used type of Rondo. The freedom is given usually to kids you just learn to play the Rondo and this will help them to focus on providing support and checking the space without worrying to count the touches or losing the ball due to not so high level of technique.
- Based on shape
- Circle : In this type of drill, the players form a circle and pass the ball to each other while one or two defenders try to intercept the ball.
- Square or rectangle: In this type of drill, the players form a box and pass the ball to each other while one or two defenders try to intercept the ball. 1 or 2 players can be located also inside the area to support the ball possession.
- Polygon: In this type of drill, the players form an area without a specific shape based on the coach’s tactical intentions. One example is to form a hexagon. Here the coach wishes to force the players to always have a diagonal position to the ball possessor in order to have a proper body profile to receive the ball.
Examples of Rondo Drills
Step 5: Add Variations
To make the drill more engaging and challenging, you can add variations to the basic structure. For example, you can add time limits, increase the number of defenders or amend the number of touches.
Another variation could be to ask the players to switch positions or playing areas after a certain number of passes.
Keep in mind that it is necessary to always have plenty of balls to keep the rhythm of the rondo high.
30 Possession, Positional and Small Sided Games
Dive into the world of tactical mastery and player development with an expansive collection
- High Tempo Football
- Players develop their technical skills and tactical understanding
- Players cultivate essential life skills such as communication, leadership, and resilience.
- They learn to adapt to varying game situations
- Think critically under pressure, and collaborate effectively with teammates
- Forging bonds that extend beyond the final whistle.
Conclusion
In conclusion, designing a Rondo drill requires careful planning and consideration of the objective, number of players, playing area, type of Rondo, and variations. By following these steps, you can create a Rondo drill that is effective, engaging, and tailored to your team’s needs.
